How to repair 220V LED plugs
Title: LED 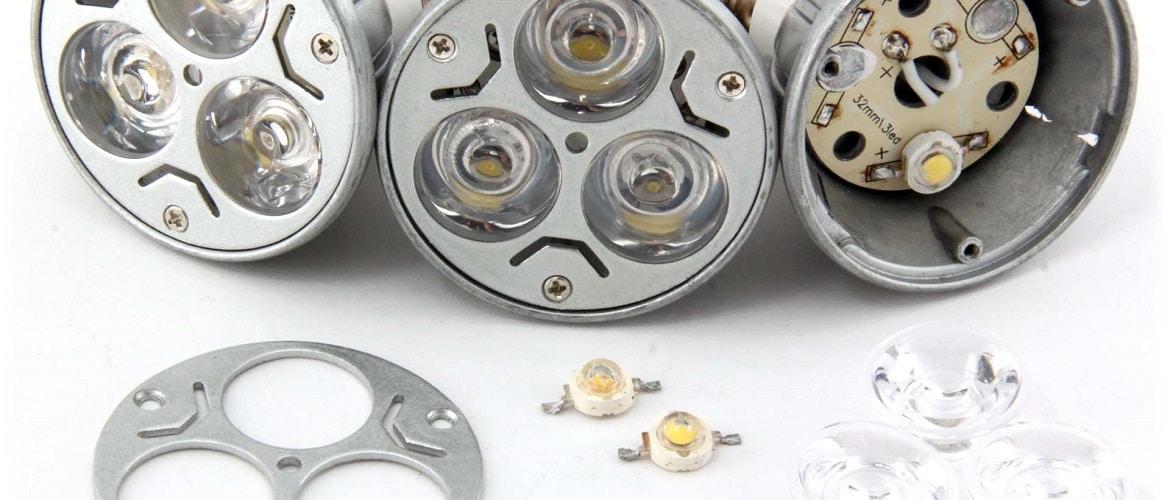
Dnes LED lamps ima almost everywhere in the house. But for pity, theses of the illuminating device often refuse many prerequisites for the term and I have many reasons for the product. I'm sorry? Do not si struva, you can send the repair. Today, let's smash some of these devices onto a screw, we can see how they are in the machine and still have experience and repair a 220 V LED lamp with your own hands.
containment: 1. Device behind LED lamp 2. Verigi on drivers and how they work 3. Cause for failure 4. Example for repair on LED mug 5. Driver repair 6. Change to LED 7. Measures for safety when repairing 220 V LED plugs 8. Video
LED lamp device
Before we undertake a practical repair, we will analyze some theoretical work on a 220 V LED lamp.
Each LED cover (SL) is ready LED lighting rod, some of them are made from a set of LEDs, positioned at the top of the board with a defined configuration, equipped with a heatsink for vented toplinate from the diode. Most metalnoto was drawn to the lamp, playing rolls on the radiator.
Diode, connect in series, save the driver - source for current. In budget devices, current pres LEDs are not stabilized and directly dependent on fluctuations in the intervoltage. When you buy a lamp, a current pres semiconductor, use a stabilizer on a given field. The second option, parsing it, is much more hopeful from prviya, but such a lamp is a little more durable and repairing is difficult.
The whole device is not supplied in a housing with one or another design, which is equipped with a base for connecting a 220 V wall and a protective cap, which at the same time plays a role on the diffuser on the light.
 Citizen by 220 V LED lamp
Shown in the mountain is a lamp with a frequency from a tyaloto, made from metal fins, playing rolls on a radiator. With some design on the lamp, the body can be made of plastics, and the radiator is all in it.
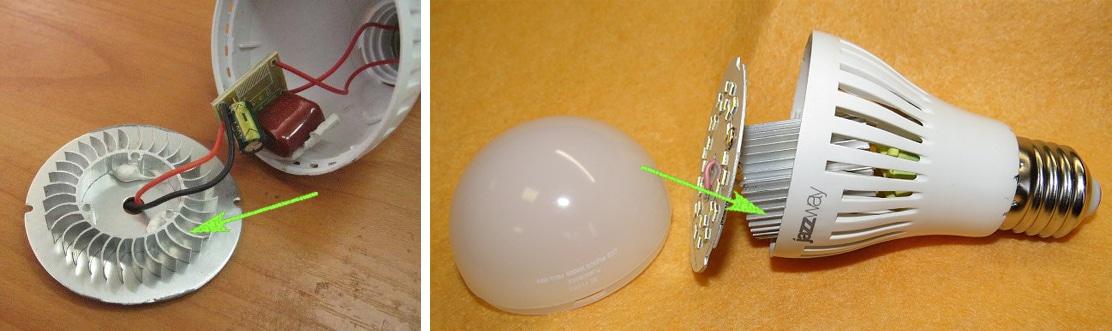 The radiator cap is located inside the plastic housing, equipped with a ventilation opening back kjm sdzharzhanieto ↑
Driver chains and how they work
For yes, the repair is successful, tryabva and imate clearly understand for tov how the lampata works. One from the main components for every LED lamp and driver. Ima many chains for drivers for 220 V LED lamps, but conventionally they can be divided into 3 types:
- Cs current stabilization.
- Ss stabilized for tension.
- Nyama stabilization.
The device itself is from the first type according to its own driver. Those are current limiting pres LEDs. The second type e is kindly named for the protection of the LED strip. Tretiyat kato tsyalo e difficult for naming, but repair mu, somehow spomenah in grief, e nai-forgive. Think for the trust on the lamp on the drivers from all types.
Current stabilized driver
The driver for the lamp, see the diagram below, the SM2082D current stabilizer is integrated at the top. Contrary to its apparent simplicity, it is also robust and of high quality, and it is not difficult to repair it.
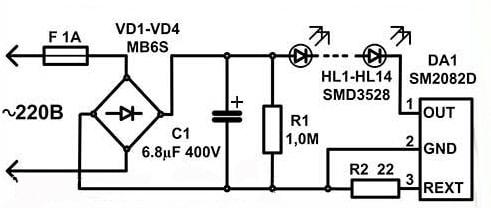 Diagram for lampat LED-A60 for full driver
The intervoltage of the supply voltage of the converter F is the diode bridge VD1-VD4 and the trace is, even if it is in good order, the capacitor C1 should be removed. Obtained by tosi, it starts to constantly voltage by applying the LED to the lamp HL1-HL14, connected in series, and shift 2 to the DA1 microcircuit.
More from the first exit on the tasi, the kjm microcircuit is led by applying voltage, stabilized from the current. The current goleminata depends on the value of the resistor R2.Resistor R1 is not available, bypass the capacitor, not participating in work on the verigata. It is necessary for the discharge of the capacitor on the capacitor, otherwise you will develop a crusher. In the opposite case, the brakes are based, take a risk and get a serious current shock, then C1 will still remain charged up to 300 V.
Driver, voltage stabilized
The Tazi scheme, according to the principle, is of sufficient quality, but tryabva, yes, I’ll turn the light-emitting diode on a slightly different beginning. Somehow the Kazakh was in grief, it beat in the right way, but we will call it the driver of the zahranvane, ty kato that stabilizer is not a current, but a voltage.
 Protecting the string behind the LED lamp
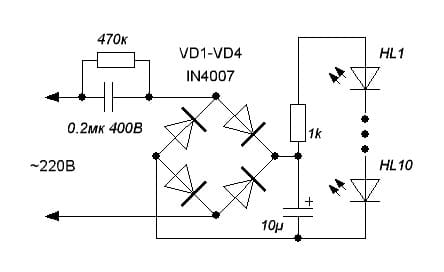
There is an intervoltage between the power supply and the ballast capacitor C1, which is painted up to about 20 V, and the next is the diode bridge VD1-VD4. Osventova, the voltage has been corrected, all removed from the capacitor C2 and supplied to the integrated voltage regulator. To that otnovo se zaglazhla (C3) and through the current limiter R2, supplying a string from the LED, connected in series. By tosi starts, dori during fluctuations in the intervoltage, the current pres LED remains constant.
There is a difference between the scheme and the predishnat e in the current limiting resistor. Everything is so Veriga on LED tape with ballast protection.
Chauffeur without stabilization
Sglobiyat according to the tasi driver scheme is a miracle in the Chinese scheme. In spite of Tov, if the tension is normal in the media and without downloading a lot, then work. The device is based on a nai-prostate circuit and does not stabilize either current or voltage. Simply lowering (tension) to approximately the desired value and correcting it.
 Nay-forgive driver for LED lamp 220 V
On the basin, the diagram shows the veche of knowledge extinguishing (ballast) the capacitor, shunting for safety with a resistor.Osvent tova is preemptively supplying a current-correcting bridge, eliminating the capacitor with an offensively small capacitance - 10 μF itself - and through a current-limiting resistor, supplying a cable from the LED.
How can you say for such a "chauffeur"? This does not stabilize anything, the voltage in the LED and, accordingly, the current directly depends on the input voltage. Ako e firme temple, togava lampata barzo more burnt out. Ako "jump", togawa bright for a moment.
This solution has been used in budget lamps from Chinese manufacturers. Understanding it, it’s difficult to say yes, it’s successful, but if you meet enough and with normal stress in the margin, you can work for a long time. Osvent tova takiva verigi lesno se remontirat.
Cause for failure
Protecting the LED lamps will burn out from the general, but, somehow, the manufacturer declares on LEDs, the resource on the light-emitting semiconductor will not last 15-20 hours? Almost all the chauffeurs are mechanical elements and contacts, which means that four MTBF shakes, but not a little. But the lamps are burning, for some reason dory will work out the guarantee for the term and the commodity. Maybe Ima a little cause for a schupvane on an electric wreck:
- Manufacturing defect... Uvi, no one is immunized from Tov. Particularly as a manufacturer of components and LEDs, the brothers are Chinese, who work in the garage and on their knees.
- Wrong operation... For example, the ventilation is bad, the lamp is closed. With such a source on the light, the lamp is preheated and everything can fail here and there - from the driver to the LED. Tova, including dust, moisture, sparks, light, etc.
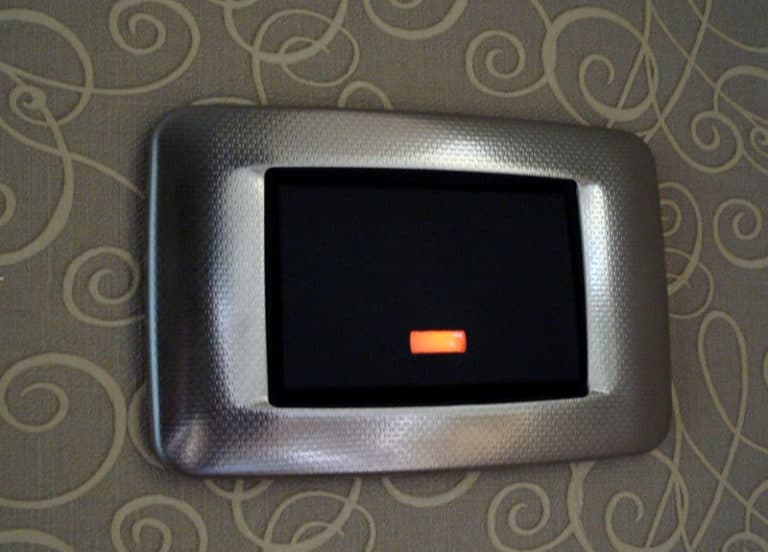 Such lighting on the switch is convenient, but causing "blinking" on the LED lamp and painting the operational belly ten times
- Losho stored… If it’s constantly jumping or it’s unusually high, dory and find a high-quality driver can “ruin your patience”. This includes constant surges in voltage, for example, when starting on powerful engines or welding equipment, and noise is impulsive.
 In the Chinese basin, the “shofort” lamp sits exactly on the scoreboard with LEDs and does not lighten up on the radiator. back kjm sdzharzhanieto ↑
Example for repair on LED mug
Ako lampata is still not in harm's way, it's not me who is hurting the Vednaga. First of all, it’s probably that yes, it’s shriveled, so you can send repairs to your own si rytse. Secondly, dory if the repair is not successful, heal the parts and be useful for repairs to another lamp.
Tryabva yes, you will get from the repair to the electric plug itself as the most important, four is defective, and not the socket, socket or cable. It’s not difficult to check everything: it’s enough to change the lamp with a well-known good, and yes, you can be sure that it’s turned on.
Whatever the trouble for repairs
Go ahead and undertake the repair, tryabva and collect everything necessary for the tov. For work, check out the tryabva:
- a soldering iron with low power;
- pinsets;
- sharp knife;
- solvent (whichever is necessary);
- multimeter.
Suitable all the same multiset - display or digital, basically, the fourth trebva give the mode for inconsistency on the diode.
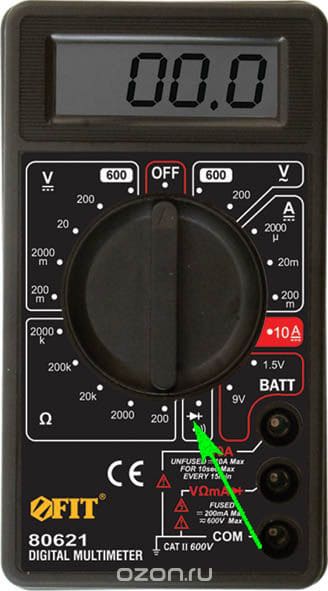
Send the device further: ima mode for testvane on diode
How to crush the LED lamp
Here tryabva and send the reservation to the vednaga: if your lamp is lit, do not work, then do not tryabva and undertake repairs. The device is sealed with a glass flask filled with an inert gas. Corrected for such a device is simply impossible.
This lamp cannot be repaired
So, if everything is ready and your lamp is not lit, then you can save it and repair the LED lamp. In the first place, the crucible trebva and the be desolated. For yes, send Comrade, dump the kapachkat on the diffuser. Tova is an ordinary forest and direct it. Ima three start for fixing on the diffuser kjm tyaloto on the device:
- With threaded vrazzka.
- From a key.
- Use the sealer.
Nay-lesno, yes, open the lamp from the threaded vrazka. For yes, send a tov, just develop the glass from the kutiyat, without yes, apply a lot of strength.
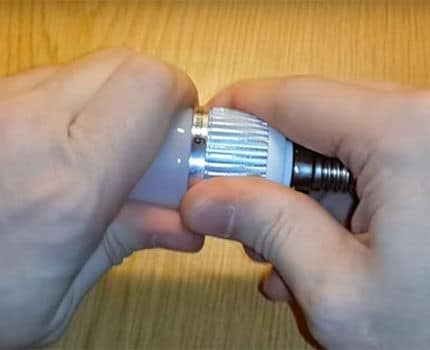 Tazi lamp ima diffuser, some may just and all development.
It is not very difficult to scratch on a lamp with a scratch. The only thing is to determine the location on the keykite, they are not visible visually. Carefully jump on the knife between the diffuser and the body, and at the right time, feel it and dump the capacat. With a known dose of patience and careful movement of the knife in a circle, you can forestry and measure the key.
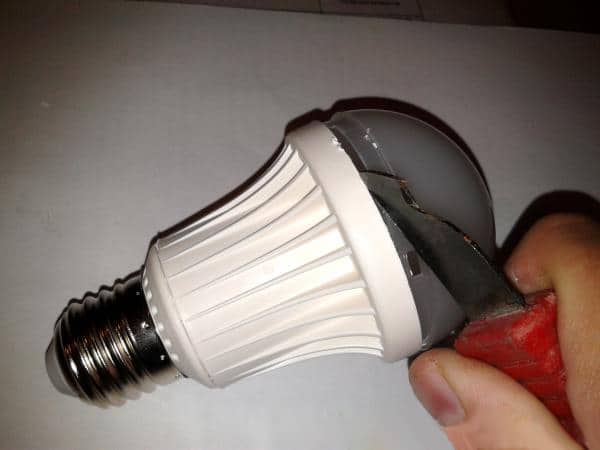 Dismantled on a lamp with a hood
Ako diffuser is placed at the top of the sealer, then repairing a little more time. Cut the stavat between the kapachkata and the tyaloto with a tank (for the preferred clerical) knife. Direct it under ygl kjm founded and possibly found -dlboko, but without fanaticism. Now, learn and develop the kapachkata, syakash with carving. Whether the sealant is of poor quality or not enough, togava scatter the bright capaccha, you can just dump it.
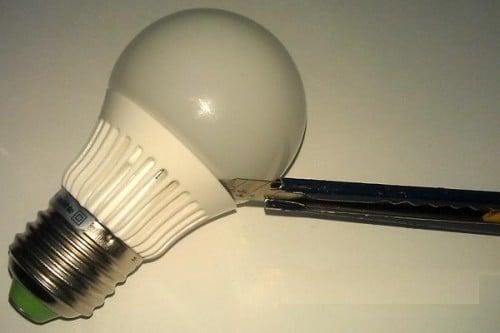 Opening on the LED top sealer with the help of a stationery knife
Don't get it? Ima still two vzmozhnosti for repairs. Take a douche and sip the diluent for the fight (not acetone!) In prolukata. The trace is known to the time of compacting more omekne and kapachka esche separating the forest.
Vtoriyat method for the repair of contaminated centrate with a technical seshoar. Tova tryabva and here govern a lot carefully, for yes not here, melt the plastic material on the cases on the lamp and the glass on the diffuser, but not on the spot. The sealant will heat up more omekne and the diffuser can be removed from the forest.
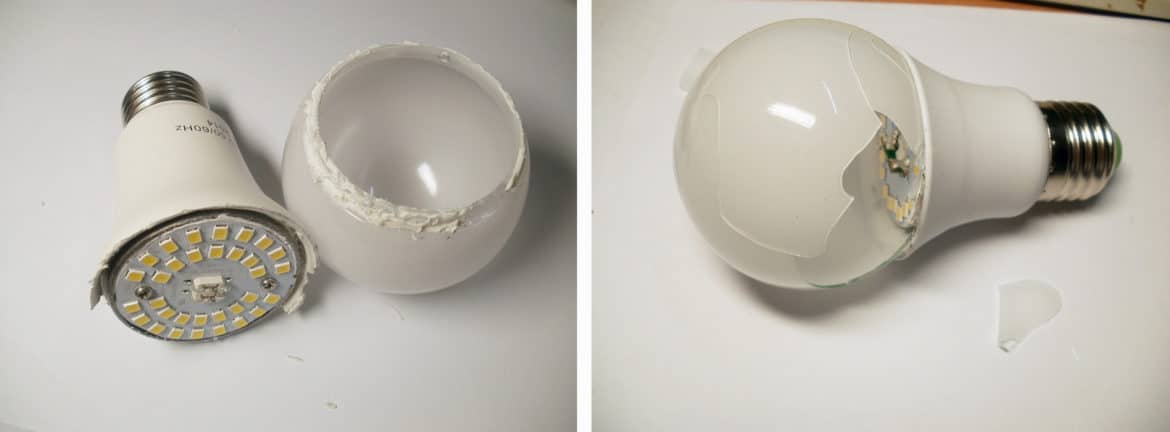 The result of carelessly razglobyavane, kogato nyama smysl yes remontir
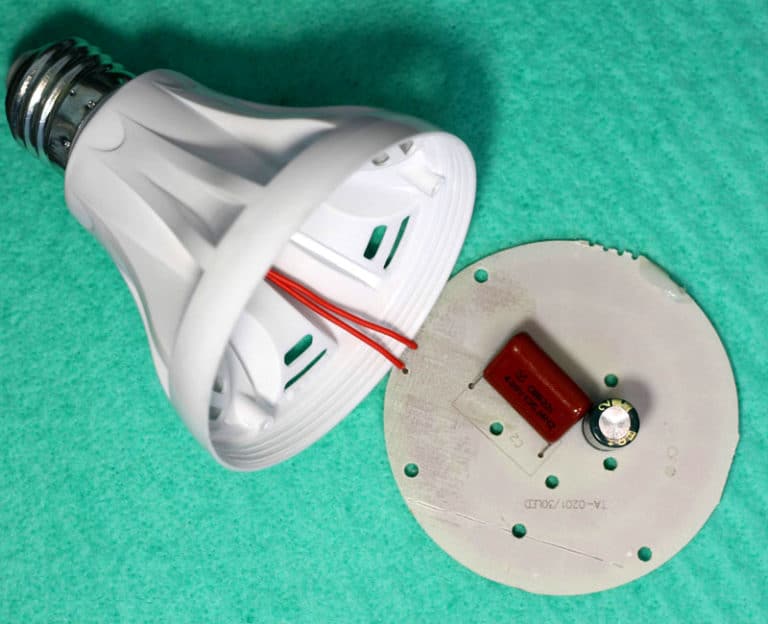
Leave and develop fasten the screws, which hold the scarf with LEDs, and I will get rid of and yes, the driver will be removed. It may have been razglobyavaneto, and this is considered to have happened, time and time for repair.
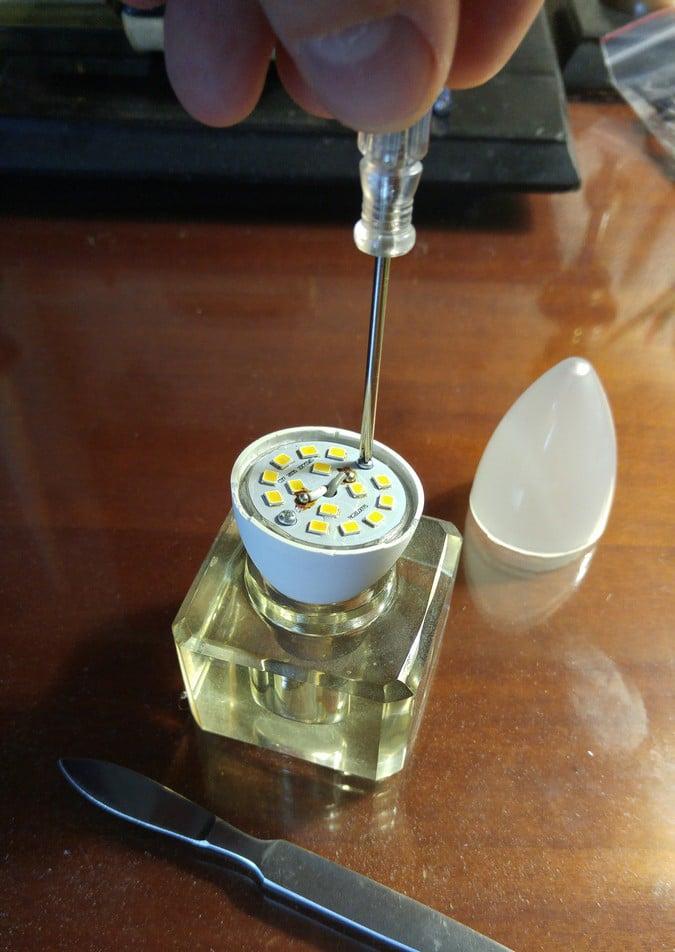 Remove the two screws holding the LED scarf
Ako nyama screw, togava nai - probably the skata is fixed with a seal. Cut it into dskata by obikolkat and carefully cut the samata dsk with a knife.
 The basin of the handkerchief is attached to the body with a seal
Suspended for malfunction
The lamp is torn apart and all the components are accessible. Globa. Start repairing si, which will visually inspect all parts of the water supply. Vsichki elementi tryabva and imat “healthy” look: don’t get dark, don’t blow or burn out.
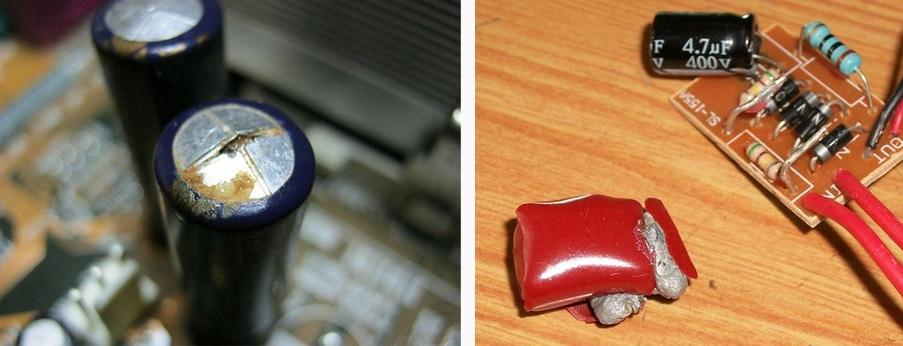 On the left side of the picture, the capacitor has failed electrolytically, it’s awesome - it’s hardened
Take a close look at the places on the Dazhbit: those are treabva and sa with high quality, without puknatini and a dupe in a spoikat.
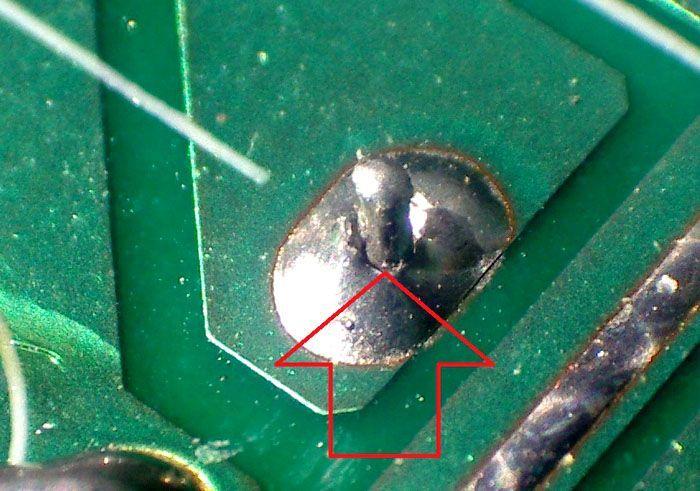 Problems on the pelvis of the lamp and in the "student" soldering - the element has a bad contact with the scarf
Ako visually all along with water, check the scarf with LEDs. Every now and then (but not wines) the LED was burning out: one or the other was burned out, or it was completely burned out.
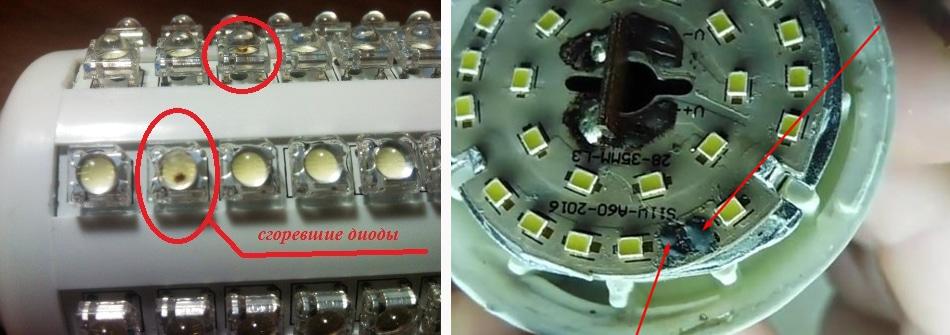 The crystal of the burning of phosphorus is brilliantly burnt out,
Thy kato vsichki LEDs are connected in series, so burn out the single LED itself, the rest of the sprat and shine.
It’s completely disassembled, which will open problems, then they will try to remove it: burn out the parts of the pipe and replace it with something similar, and suspiciously, if the pipe is drunk, it will be drunk with good, the soldering iron will burn with a naked amount of flow. You can read how and change the LED in the next section to the status. Open the furnace problems and gi remove? Turn on the lamp and given the repair adventure.
Ako visually all the time, use the tester for a better repair. Let’s save some light from a scarf with LEDs, so check it out and check the probability of damage to the tozi in the e-golyama. Turn on the multiset, for yes, check the diode and ring the LED in the doorway for all. In the first step, the device will show more naked resistance, in the other, the diode will be weaker.
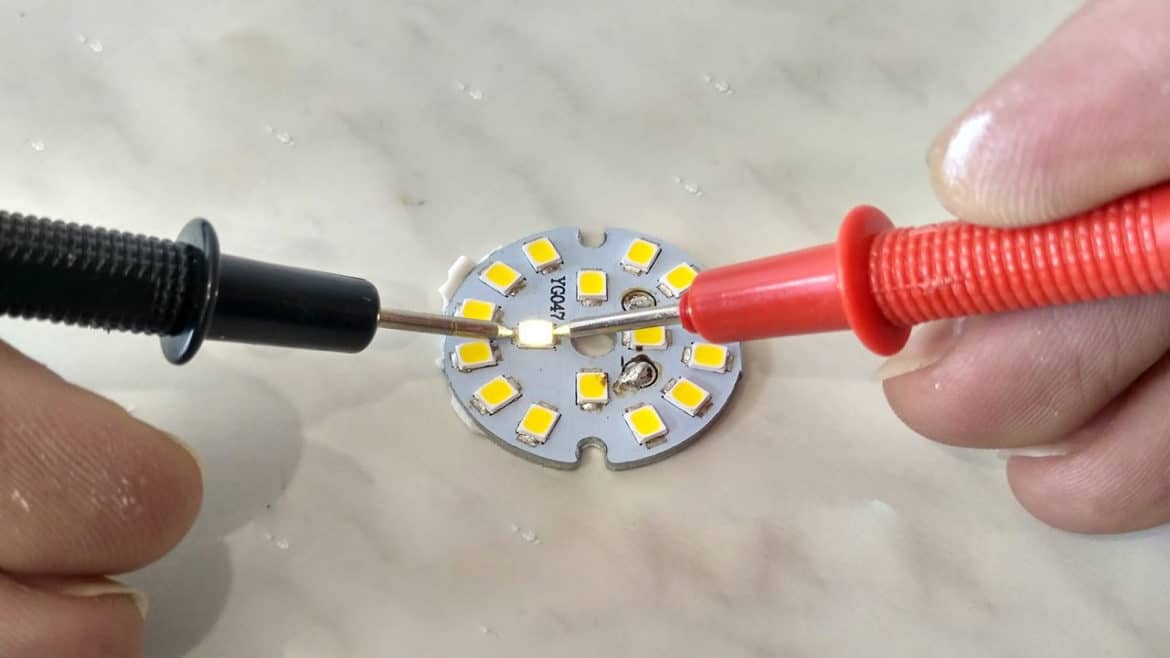 The diode is working in one position on the multi-cell sonde lighter
Can't you call on a single diode? Mozhe bi shoforat se nameva in tova. Unsolder one from the conductor from the driver to the LED scoreboard and repeat dialing.
 If you need to check the driver on the diode, you can turn it off, then boil one from the protection of the conductors from the module.
Ako is one from diode se djrzhi different from stop, that tryabva yes bde replaced with similar. Ako vsichko e nared, you can and complete the check on the LED module - that work is correct. Let's take a moment to repair the driver.
Water repair
Parvo, call on the representative, aka ima taqv. The device is shaking and showing zero resistance. Comrade can be yes, without yes, dump the predpazite from the scarf. Did the device show an infinitely high resistance? Change the prepositioner and turn on the lamp for the testvane. Do you shine? Repair adventure. Ako proposes to edit, continue the repair. Check the diode bridge... How can you send Comrade, you can analyze it in detail knock.
Did Diodniyat bridge work? Next, remove the electrolytic condenser from the steamer and call it. If the condenser is correct, then at the initial moment it will show a little resistance at the inexpressible multiplicity, but it will grow before clearing, until it reaches infinity.
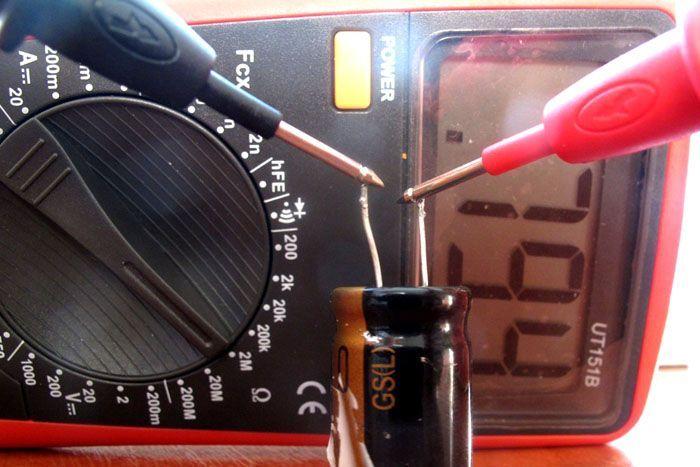 Checking for electrolytic capacitor with multicet
Ako vodachte is simple, as in all cases, togava all these manipulations with the sigmournost will lead to success and complete the repair. Ako driver is complicated, togava vsichko, you can send something, but you can also stop the electrolytic capacitors and diodes. Capacitor it out of steam in a forest, the very only way out can be, and if it is, it is exhausted from the diode. For this karate and ruin the contact with the skat, it’s enough to move the device with a needle or pinset.
Ako tuk vsichko e nared, you see, for in-natashni in-complicated repairs, more trouble and get help for a qualified electronics engineer.
Change to LED
The main defect on the SMD element will appear for some problems with the repair on the equipment, some of them are in the company. Dismantling on such elements, especially those with a lot of shielding, can be a lot problematic. But as a device with two pins, it can be saved with the help of a soldering station and repair is much simpler. Pick up a twin poyanik, to some place, having delivered the station to the station, heat at the same time two conductors on the diode and remove the poyanik, like on a pinset, you will miss the element from the duskat.
 Dismantling on the SMD capacitor with a double soldering iron
Ako washta station for zapoyavane ima samo one poyalnik (something se case nai-chesto), togawa ima is another option.You can use the sesoara, some of you delivering ss station for drinking. Blow out the defective diode ss shoar and in a short time, soak it up and remove it from the area with a needle or pinset pin. The trail of the kato calm down, stop, the LED may be forest and all the way from the headscarf.
 Premahvane on led ss sechoar
For repairing LED lamps, instead of a sewer, you can use it technically, but the diameter of the nozzle for mu treabva and be minimal. Otherwise, you will heat up the aluminum substrate and generally evaporate it (the power at the heat exchanger is even sufficient), or the LEDs on the lamp will fly out more from the place where they are, or conduct more leaks. In this case, the repair case is still seriously complicated, but it is generally possible.
How can we change the LED in the lamp, aco nyama sesoar or station for soldering
Understanding this, not all the same ima station for zapoyavane for takiva repair (az, for example, nyamam takava at home). In this case, you can use the old soldering iron for repairs, so you can exchange it for a better one. Just wind the copper winding bodies with a diameter of 1-2 mm at the top of the stomach and sharpen and tin the edges on the zhizata. Isn't the station for a repair charge and a replacement for SMD parts?
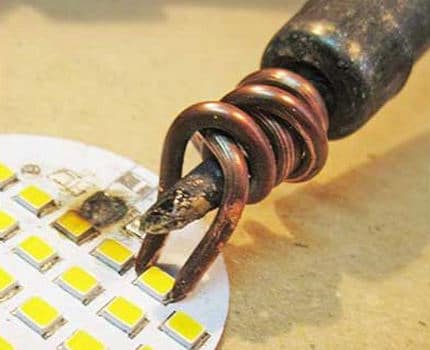
Premahvane on SMD LED with ordinary soldering iron
Leave it and change the LED and repair it, you can turn it on. Tova may be with a poyanik with a tunk vrah or ordinary, but modified for soldering (see the picture on the mountain). Before soldering, remove excessive calm from the substrate and apply the flux on the top. Now put a new LED on the spot, reverse the polarity, get the pinset from the fin and calm down. Keep an eye on how the LED will light up the ripple and be sure to know the type of torch.In a disgusting case, the repair is nim and continue for a long time.
Prepaid measurements when repairing 220 V LED plugs
Thy kato remontirame device, protected from mrezhat, yama nikade without pre-measurement. LED lamp and mat is transformerless stored, almost all elements are on the verigata in time for work on the device, including the LED, while under the stomach-frightening voltage. Zatova take it, follow the measurements:
- Vsichki soldered and measured in time for repairs, the trebbling and all perverted by itself in the lamp is turned off.
- Dori ako condenser sa shuntirani from discharge the resistors, turn off the lamp, cut off all the condenser strings. For yes, direct the product, a sufficient connection to the capacitor conductors in a second with any metal tool with a dielectric drive.
- Grab it for cleaning it, then turn on the device and then repair it. Somehow this is an obrka, all the same from the elementite, maybe an explorer. Be kind, turn it on, turn it on and turn it on.
- Do not leave the burner turned on unattended and do not place it on top of the burnt objects in time for repair during repairs. 260 degrees e is relatively small, but sufficient, for yes, the fire was lit.
On Tova we can bi, we can join. Now you know how to work and how to work LED lamps. And if it is necessary, you can correct it yourself.
Video
PreviousLamps, applicationsHow you can type linear LED illuminatorsNextLEDHow to choose 12 volts and LED caps